Perry Wu 發表在
痞客邦
留言(0)
人氣()

cookies
當server想要儲存使用者的某些狀態時,就可以發送cookie給client,cookie是http header裡面其中一個欄位,cookie裡的資料以key/value的形式儲存,cookies通常儲存在client的瀏覽器中,也因此若當cookie並沒有加密時,在傳送的過程中容易被攔截或盜取,故並不鼓勵以cookie儲存一些敏感的資料,除了加密之外,更要設定時間在不需要cookie的時候將它刪除。
每個cookies的檔案最大只能到4k,在使用者瀏覽網站的時候瀏覽器會將cookie儲存在記憶體中,當瀏覽器關閉時,尚未expire的cookies會被存進文字檔中,並等待下次連線使用。
Perry Wu 發表在
痞客邦
留言(0)
人氣()
直接使用javascript的話, 我們可以這樣寫:
window.location = "url_to_redirect";
Perry Wu 發表在
痞客邦
留言(0)
人氣()
大部分的人包含我在內,在開發oauth相關工具時,使用Github用的很高興,
寫出了一段code,確定oauth可以運作,就很高興的把code放上github了
如以下範例程式
Perry Wu 發表在
痞客邦
留言(0)
人氣()
安裝Linux的Client以及推上Heroku上
1. 安裝client工具
$ wget -qO- https://toolbelt.heroku.com/install-ubuntu.sh | sh
Perry Wu 發表在
痞客邦
留言(0)
人氣()
1. 建立certificate檔案
$ openssl genrsa -out pillaAuth-key.pem 1024
$ openssl req -new -key pillaAuth-key.pem -out certrequest.csr
$ openssl x509 -req -in certrequest.csr -signkey pillaAuth-key.pem -out pillaAuth-cert.pem
Perry Wu 發表在
痞客邦
留言(0)
人氣()
目的
測試telegram在rpi CLI的模式下運作機制
安裝步驟
Perry Wu 發表在
痞客邦
留言(0)
人氣()
目的
使存取localhost:5000/app/app1 轉到localhost:3000
使存取localhost:5000/app/app2 轉到localhost:3001
這樣...
Perry Wu 發表在
痞客邦
留言(0)
人氣()
* UDP Flooding - Dst
hping3 -I eth1 --udp --rand-source 192.168.1.100
Perry Wu 發表在
痞客邦
留言(0)
人氣()
1. 創建package.json文件
這一步可以使用範例copy過來修改即可
$> mkdir example
$> cd example
$> npm init
按照提示輸入package名, description, email, version等信息,就自動生成以下文件:
{
“name”: “example”,
“version”: “0.0.1〃,
“description”: “test npm commit”,
“main”: “index.js”,
“scripts”: {
“test”: “echo \”Error: no test specified\” && exit 1〃
},
“repository”: “”,
“author”: “yunjing”,
“license”: “MIT”
}
Perry Wu 發表在
痞客邦
留言(0)
人氣()
目的
在手機配對RPI2的BlueZ時,一直失敗,找了資料發現要改/usr/bin/bluez-simple-agent的capability 才可以配對?所以針對這個參數來了解BlueZ以及BlueTooth的相互關係
BlueTooth的SSP定義了安全配對的方法
Perry Wu 發表在
痞客邦
留言(0)
人氣()
目標
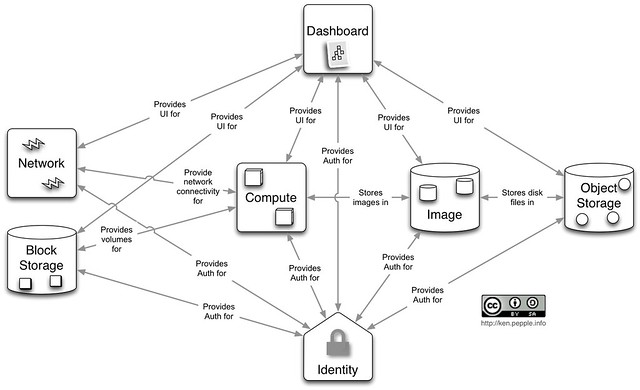
工作需要,所以快速的找了一些Openstack的資料,預期先了解這套系統的大概,在看下一步要做什麼。
OpenStack基本介紹
Perry Wu 發表在
痞客邦
留言(0)
人氣()
