公告版位

目前分類:Node.js (14)

瀏覽方式: 標題列表 簡短摘要

cookies

當server想要儲存使用者的某些狀態時,就可以發送cookie給client,cookie是http header裡面其中一個欄位,cookie裡的資料以key/value的形式儲存,cookies通常儲存在client的瀏覽器中,也因此若當cookie並沒有加密時,在傳送的過程中容易被攔截或盜取,故並不鼓勵以cookie儲存一些敏感的資料,除了加密之外,更要設定時間在不需要cookie的時候將它刪除。 每個cookies的檔案最大只能到4k,在使用者瀏覽網站的時候瀏覽器會將cookie儲存在記憶體中,當瀏覽器關閉時,尚未expire的cookies會被存進文字檔中,並等待下次連線使用。

Session

相對於cookies處存在client端,session則是儲存在server端,session也需要cookie的輔助才能產生運作,因為server會傳送存有session id的cookie給client,並在server端建立起這個session id的檔案,在之後client在瀏覽網頁時都會夾帶此session id,如此一來server即可從此session id來辨認每個使用者所儲存的狀態與data。相對於cookies,session多用來儲存敏感的資料,也常常成為攻擊的目標,如session hijacking。

遇到的問題

在處理Auth Serveer遇到的問題。

以google的Oauth2來說,

文章標籤

Perry Wu 發表在 痞客邦 留言(0) 人氣()

大部分的人包含我在內,在開發oauth相關工具時,使用Github用的很高興, 寫出了一段code,確定oauth可以運作,就很高興的把code放上github了


如以下範例程式

var GoogleStrategy = require('passport-google-oauth').OAuth2Strategy;
 passport.use(new GoogleStrategy({
    clientID: GOOGLE_CLIENT_ID,
    clientSecret: GOOGLE_CLIENT_SECRET,
    callbackURL: "http://127.0.0.1:3000/auth/google/callback"
  },
  function(accessToken, refreshToken, profile, done) {
    User.findOrCreate({ googleId: profile.id }, function (err, user) {
      return done(err, user);
    });
  }
));

但,clientId以及ClientSecret也一起上去了。 Github是open的空間,很難保證之後是否會有有心人士,把你註冊的clientId/clientSecret資訊拿來用。 如果client有用到的是需要付費的api,就慘了!


在放上github前,先做些保護吧

文章標籤

Perry Wu 發表在 痞客邦 留言(0) 人氣()

安裝Linux的Client以及推上Heroku上

1. 安裝client工具

$ wget -qO- https://toolbelt.heroku.com/install-ubuntu.sh | sh

2. heroku login

$ heroku login
Enter your Heroku credentials.
Email: perry.wu0606@gmail.com
Password (typing will be hidden): 
Authentication successful.

3. 到有git的app下建立連結

沒有git的就自己git 出來吧!

要確定該folder有Procfile這個檔案

$ cat Procfile
web: node index.js

$ heroku create
Creating fast-brook-1101... done, stack is cedar-14
https://fast-brook-1101.herokuapp.com/ | https://git.heroku.com/fast-brook-1101.git
Git remote heroku added

$ git remote -v
heroku  https://git.heroku.com/fast-brook-1101.git (fetch)
heroku  https://git.heroku.com/fast-brook-1101.git (push)
origin  https://github.com/heroku/node-js-getting-started.git (fetch)
origin  https://github.com/heroku/node-js-getting-started.git (push)

4. 推到heroku上執行

$ git push heroku master
remote: Compressing source files... done.
remote: Building source:
remote: 
remote: -----> Node.js app detected
remote: 
remote: -----> Reading application state
remote:        package.json...
remote:        build directory...
remote:        cache directory...
remote:        environment variables...
remote: 
remote:        Node engine:         0.12.2
remote:        Npm engine:          unspecified
remote:        Start mechanism:     Procfile
remote:        node_modules source: package.json
remote:        node_modules cached: false
remote: 
remote:        NPM_CONFIG_PRODUCTION=true
remote:        NODE_MODULES_CACHE=true
remote: 
remote: -----> Installing binaries
remote:        Downloading and installing node 0.12.2...
remote:        Using default npm version: 2.7.4
remote: 
remote: -----> Building dependencies
remote:        Installing node modules
remote:        express@4.9.8 node_modules/express
remote:        ¢u¢w¢w utils-merge@1.0.0
remote:        ¢u¢w¢w merge-descriptors@0.0.2
remote:        ¢u¢w¢w fresh@0.2.4
remote:        ¢u¢w¢w cookie@0.1.2
remote:        ¢u¢w¢w escape-html@1.0.1
remote:        ¢u¢w¢w range-parser@1.0.2
remote:        ¢u¢w¢w cookie-signature@1.0.5
remote:        ¢u¢w¢w finalhandler@0.2.0
remote:        ¢u¢w¢w vary@1.0.0
remote:        ¢u¢w¢w media-typer@0.3.0
remote:        ¢u¢w¢w methods@1.1.0
remote:        ¢u¢w¢w parseurl@1.3.0
remote:        ¢u¢w¢w serve-static@1.6.5
remote:        ¢u¢w¢w path-to-regexp@0.1.3
remote:        ¢u¢w¢w depd@0.4.5
remote:        ¢u¢w¢w qs@2.2.4
remote:        ¢u¢w¢w on-finished@2.1.1 (ee-first@1.1.0)
remote:        ¢u¢w¢w debug@2.0.0 (ms@0.6.2)
remote:        ¢u¢w¢w etag@1.4.0 (crc@3.0.0)
remote:        ¢u¢w¢w proxy-addr@1.0.8 (forwarded@0.1.0, ipaddr.js@1.0.1)
remote:        ¢u¢w¢w send@0.9.3 (destroy@1.0.3, ms@0.6.2, mime@1.2.11, on-finished@2.1.0)
remote:        ¢u¢w¢w type-is@1.5.7 (mime-types@2.0.12)
remote:        ¢|¢w¢w accepts@1.1.4 (negotiator@0.4.9, mime-types@2.0.12)
remote: 
remote: -----> Checking startup method
remote:        Found Procfile
remote: 
remote: -----> Finalizing build
remote:        Creating runtime environment
remote:        Exporting binary paths
remote:        Cleaning npm artifacts
remote:        Cleaning previous cache
remote:        Caching results for future builds
remote: 
remote: -----> Build succeeded!
remote: 
remote:        node-js-getting-started@0.1.3 /tmp/build_e36f0548cd7e9ef2a4f9015fd5e300e5
remote:        ¢|¢w¢w express@4.9.8
remote:        
remote: -----> Discovering process types
remote:        Procfile declares types -> web
remote: 
remote: -----> Compressing... done, 9.3MB
remote: -----> Launching... done, v3
remote:        https://fast-brook-1101.herokuapp.com/ deployed to Heroku
remote: 
remote: Verifying deploy... done.
To https://git.heroku.com/fast-brook-1101.git
 * [new branch]      master -> master

5. 連網頁測試

一推上後會看到訊息, 由訊息的連結就可以存取剛剛放上去的應用 https://fast-brook-1101.herokuapp.com/ 也可使用heroku apps:info來查詢連結資訊

要注意的是heroku會需要應用裡面有設定pro

其他指令

* 讓app只在web上佈署一台

$ heroku ps:scale web=1
Scaling dynos... done, now running web at 1:1X.

* To shutdown the app

$ heroku ps:scale web=0

* 看目前現有的app列表

heroku apps
heroku apps:info

Perry Wu 發表在 痞客邦 留言(0) 人氣()

1. 建立certificate檔案

$ openssl genrsa -out pillaAuth-key.pem 1024 
$ openssl req -new -key pillaAuth-key.pem -out certrequest.csr
$ openssl x509 -req -in certrequest.csr -signkey pillaAuth-key.pem -out pillaAuth-cert.pem

2. 編輯JS如以下的檔案

var fs = require('fs');
var https = require('https');
var express = require('express');
var app = express();

var hskey = fs.readFileSync('pillaAuth-key.pem', utf8);
var hscert = fs.readFileSync('pillaAuth-cert.pem', utf8);

var credentials = {
    key: hskey,
    cert: hscert
};

https.createServer(credentials, app).listen(3001, function() {
    console.log('Express https server listening on port ' + 3001);
});

文章標籤

Perry Wu 發表在 痞客邦 留言(0) 人氣()

目的

使存取localhost:5000/app/app1 轉到localhost:3000

使存取localhost:5000/app/app2 轉到localhost:3001

這樣...

var express = require('express');
var app = express();
var http = require('http'),
    httpProxy = require('http-proxy');

app.set('port', process.env.PORT || 5000);

var proxy = httpProxy.createProxyServer();

app.all('/app1/*', function(req, res, next){
    console.log(req.url);
    req.url = req.url.slice(5);
    proxy.web(req, res, {
        target: 'http://127.0.0.1:3000'
    }, function(e) {
        console.log(e);
    }); 
});

app.all('/app2/*', function(req, res, next){
    console.log(req.url);
    req.url = req.url.slice(5);
    proxy.web(req, res, {
        target: 'http://127.0.0.1:3001'
    }, function(e) {
        console.log(e);
    }); 
});

http.createServer(app).listen(app.get('port'), function() {
    console.log('Express server listening on port ' + app.get('port'));
});

使用這段Code,可以將存取

localhost:5000/app1/ 的動作轉到localhost:3000/

文章標籤

Perry Wu 發表在 痞客邦 留言(0) 人氣()

1. 創建package.json文件

這一步可以使用範例copy過來修改即可

$> mkdir example
$> cd example
$> npm init
按照提示輸入package名, description, email, version等信息,就自動生成以下文件:
{
“name”: “example”,
“version”: “0.0.1〃,
“description”: “test npm commit”,
“main”: “index.js”,
“scripts”: {
“test”: “echo \”Error: no test specified\” && exit 1〃
},
“repository”: “”,
“author”: “yunjing”,
“license”: “MIT”
}

2. 添加用戶

$>npm adduser
按照提示輸入用戶名,密碼和郵箱

3. 發布

$>npm publish

如果不帶參數,則會在當前目錄下查找package.json文件,按照該文件描述信息發布;

如果指定目錄,就會在指定目錄下查找package.json文件

4. 驗證

訪問http://search.npmjs.org/ 可以查詢剛剛發布的module

5. 下載使用

$>npm install example

6. 版本更新

修改package.json裡的版本號,重新npm publish

7. 取消發布

$>npm unpublish

文章標籤

Perry Wu 發表在 痞客邦 留言(0) 人氣()

目標

使用node.js裡的套件googleapis來完成google API的存取測試

1. 安裝套件

npm install googleapis

2. 申請Google Developer

連到Google Developers開立Developer權限囉!

3. 建立憑證

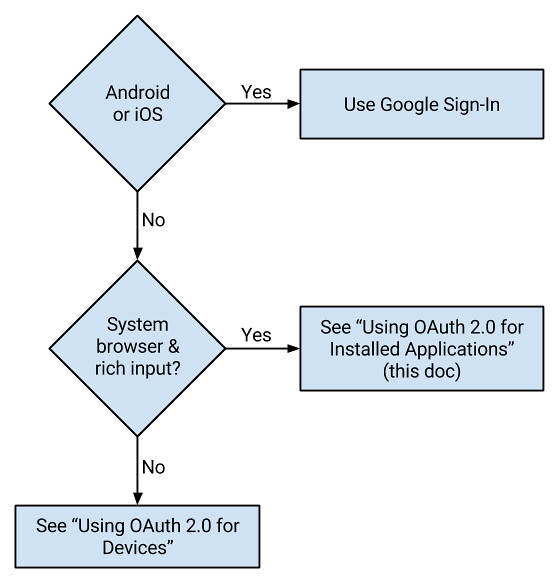
花了些時間看了GOOGLE提供的幾種OAUTH的方法,最後由於應用的方式,所以選擇了"Using OAuth 2.0 for Installed Applications"

device-auth-decision-installedapp

文章標籤

Perry Wu 發表在 痞客邦 留言(0) 人氣()

隨著現在超過數十萬個套件在NPM上,常常發現有些套件,有著非常接近自己想要的功能,但是卻有些微的Bug存在。常言到,出來寫程式的,誰人沒BUG?


現在,這取決於誰在維護這個套件,比較簡單的方式,可以通過開一個GitHub的Issue,並等待作者解決了這個問題。另一個方法,則是實際捲起袖子,自己解決問題。


這篇文章,在描述如何使用github來達成修正npm套件小問題,進而將修改過的套件套用在自己的應用裡

文章標籤

Perry Wu 發表在 痞客邦 留言(0) 人氣()

目標

做些簡單的操作測試,確認node-dbox存取dropbox的方式

步驟

1. 開立dropbox的developer帳號

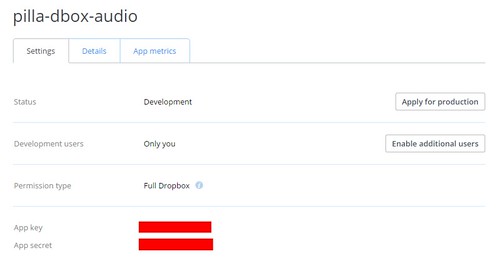
2. 在App console建立一個APP

dropbox-appconsole

3. 建立完成後取得App Key 以及App secret

dropbox-appconsole2

4. 在node.js環境下,下載dbox

npm install dbox

5. 使用以下的codes取得requesttoken

APP Key以及App secret要填上申請到的值
var dbox = require("dbox");
var app = dbox.app({
    "app_key": "074qsqsxxxxxx7",
    "app_secret": "nh3fq57z1xxxxxx"
});

app.requesttoken(function(status, request_token) {
    console.log(request_token);
}

執行後會得到以下訊息

{ oauth_token_secret: 'tQBkyYUAbaTV5Uet',
  oauth_token: 'SKCKHQvUp0oU5w22',
  authorize_url: 'https://www.dropbox.com/1/oauth/authorize?oauth_token=SKCKHQvUp0oU5w22' }

6. 開啟瀏覽器,把authorize_url貼上url欄位,並開啟

authConfirm

文章標籤

Perry Wu 發表在 痞客邦 留言(0) 人氣()

目標

如前一篇實作的範例(使用cheerio 抓取蘋果日報的RSS資訊)

這裡接著要做的是讀取CNN的RSS資訊

一個中文的網站一個英文的網站來當練習,哈哈...

CNN的RSS連結為 http://edition.cnn.com/services/rss/

cnnRSS

Perry Wu 發表在 痞客邦 留言(0) 人氣()

目標

在node.js下使用cheerio以及request來讀取蘋果日報的RSS資訊

在http://www.appledaily.com.tw/rss這裡可以看到有提供的的即時新聞群組列表

而這次實作的目的就在於取得群組列表以及將指定列表中的資訊抓下來


appleRSS

實作

先使用Firebug確認要取得的條件後

文章標籤

Perry Wu 發表在 痞客邦 留言(0) 人氣()

簡介

開發應用時突然發現要準備網頁的多國語系支援,上網找一下資料發現多國語系可以做在前台,也就是網頁html+js的搭配組合完成語系呈現。

前端開發可參考此連結,我是沒多研究就是了

另一種就是直接後台給html時就包含了語系呈現了

個人傾向使用後台來達成這樣的機制,後台開發視野遼闊阿...,因為之前使用的是express + swig來達成MVC的動作,

所以這裡加入i18next,來達成多國語系

文章標籤

Perry Wu 發表在 痞客邦 留言(0) 人氣()

Install redis

  1. wget http://download.redis.io/releases/redis-3.0.0.tar.gz

  2. tar xvfz redis-3.0.0.tar.gz

  3. cd redis-3.0.0

  4. make

  5. server and client are placed in src/redis-server and src/redis-cli respectively.

Perry Wu 發表在 痞客邦 留言(0) 人氣()

現象/問題:

使用winscp把中文檔案丟到linux 上,發現那些中文檔案無法使用node.js的readdir來存取 但是使用samba把中文檔案丟到linux上,readdir卻可以存取 此外, winscp上傳的中文檔,用SAMBA登入看到亂碼 SAMBA上傳的中文檔,用winscp登入看到是亂碼

解釋/過程:

winscp預設不知到是用什麼隊檔名進行編碼動作,所以winscp的檔名linux看不懂,只有winscp自己看得懂 而且,檔名編碼是根據每個應用程式的 如winscp高興使用特殊編碼來寫檔名,winscp自己看得懂就OK 讓winscp使用UTF-8的方式,設定步驟︰ 在 WinSCP 登入 (WinSCP Login) 畫面,點選有亂碼問題的期間 (Session) ,按下右側的編輯 (Edit) 。 將協定 (Protocol) 選為 SFTP 或 FTP 。 按左邊的環境 (Environment) ,把 UTF-8 檔案名稱編碼 (UTF-8 encoding for filenames) 從自動 (Auto) 改成開 (On) 。 按下儲存 (Save) 。

結論:

撞到這個問題一開始沒想到是winscp的問題,裝了iconv-lite做不停的轉碼測試,都沒有結果 一度想放棄來使用 workaround來讀取檔名資訊,以為顯示不正常是因為shell的問題....
  • ls --show-control-chars
  • tree -X
最後發現是winscp的問題... 出來混的還是要還... 整個系統使用UTF8進行檔名編碼最好

附註:


文章標籤

Perry Wu 發表在 痞客邦 留言(0) 人氣()